
How To Make a Youtube Channel In 2025… Starting a YouTube channel can open up many exciting opportunities. The best part is that you get to share your ideas, skills, and stories with people all over the world who enjoy the same things you do. Over time, this can grow into a community of thousands, or even millions, who look forward to your content.
As your channel grows, you may also earn money through monetization, turn it into a full-time career, or even build a business around it.
Our expert creator Rob has already shared valuable insights for beginners, including the latest tips and updates. While there are countless strategies to explore, new creators should first focus on the most important basics. (You can watch the video above for a detailed guide!)
Remember, you’re not alone in this journey—millions of people are creating content on YouTube, all chasing creativity, freedom, and community. That’s why learning how to build your channel the right way is so important. With the right steps, you can stand out and succeed.
1. Create a Google Account ( For Beginners)
Ready to kick off your YouTube journey? The first step is simple—create a Google account in Your Mobile phone or Desktop. All you need to do is head over to the Google sign-up page, fill in a few details, and you’re all set to begin.
1. Go to the Google Account Creation Page
Open your browser and type 👉 https://accounts.google.com/signup
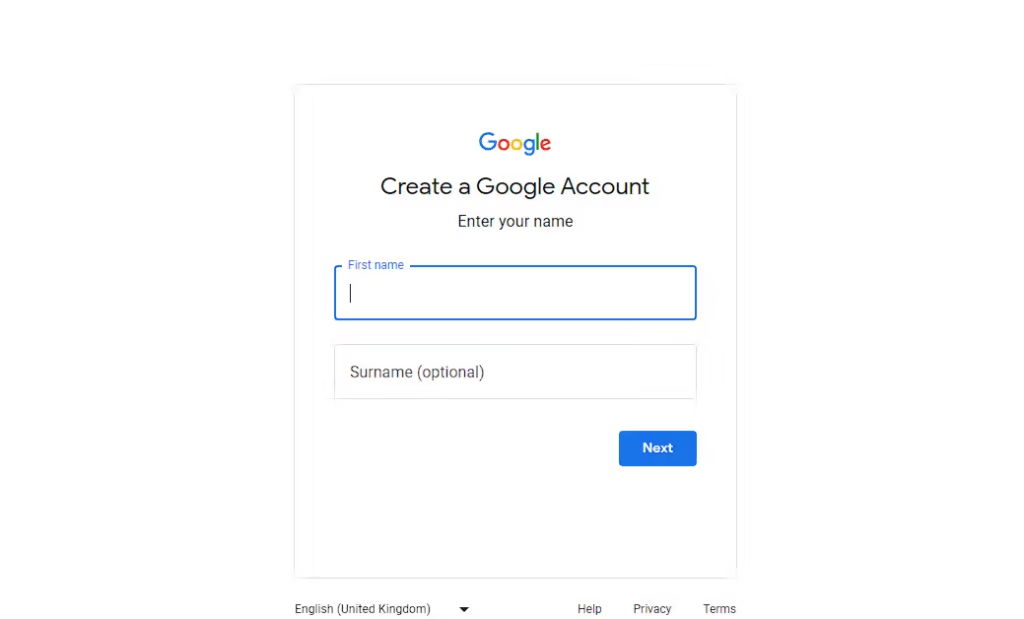
2. Fill Out Your Basic Information
- Enter your First name and Last name.
- Choose a username (this will become your Gmail ID, e.g., yourname@gmail.com).
- Create a strong password (use at least 8 characters with letters, numbers, and symbols).
- Re-enter the password to confirm.
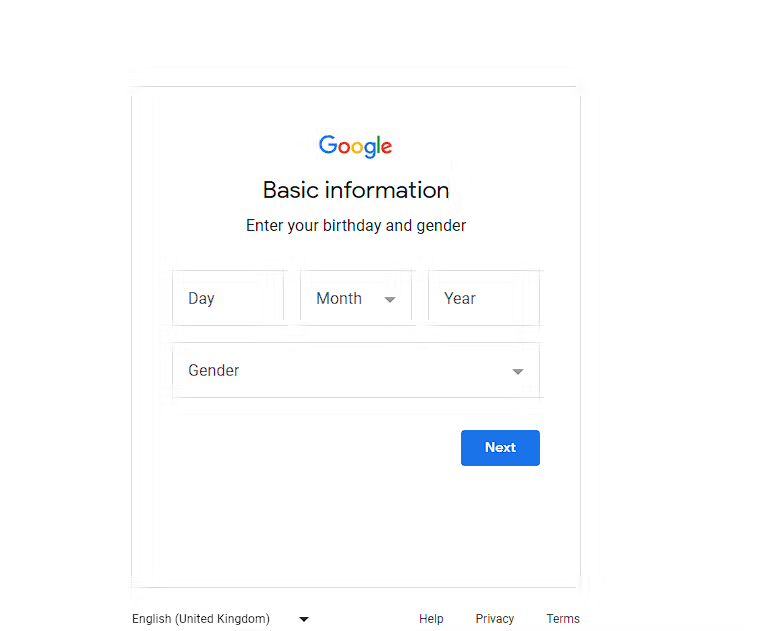
3. Add Recovery Information (Optional but Recommended)
- Enter your phone number (Google will use it for account recovery & security).
- Enter your phone number (Google will use it for account recovery & security).
- Provide your date of birth and gender.
4. Verify Your Phone Number
If you add a phone number, Google will send a 6-digit code via SMS.
Then,Enter the code to verify.
5. Accept Google’s Privacy & Terms
Read through the terms.
Click “I Agree” to continue.
6. Your Google Account is Ready
Now you can use Gmail, YouTube, Google Drive, Google Photos, Docs, and all other Google services with this one account.
Pro Tips for Beginners:
- Remember your password or save it in a secure password manager.
- Choose a simple but professional username if you’ll use it for work/school.
- Always keep your recovery email/phone updated for security.
2. Create a YouTube Channel in These Steps
Set up your YouTube Channel (Easy Steps):
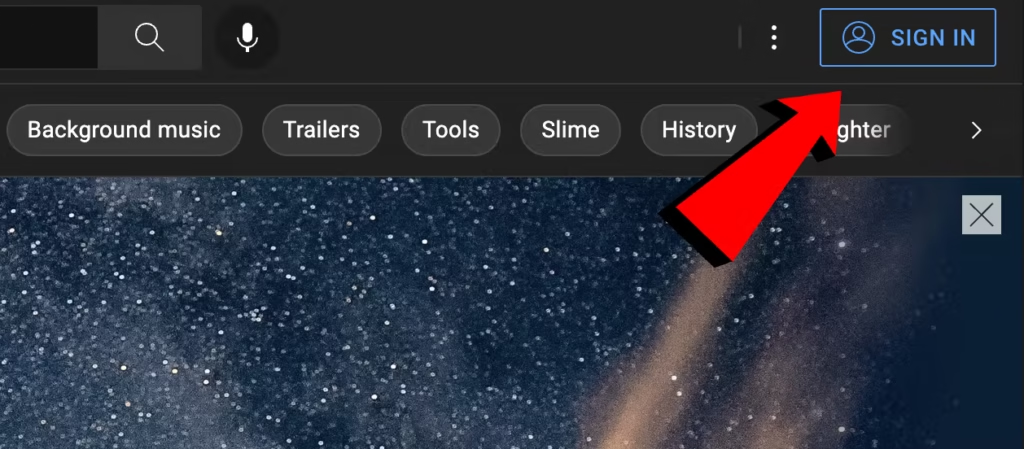
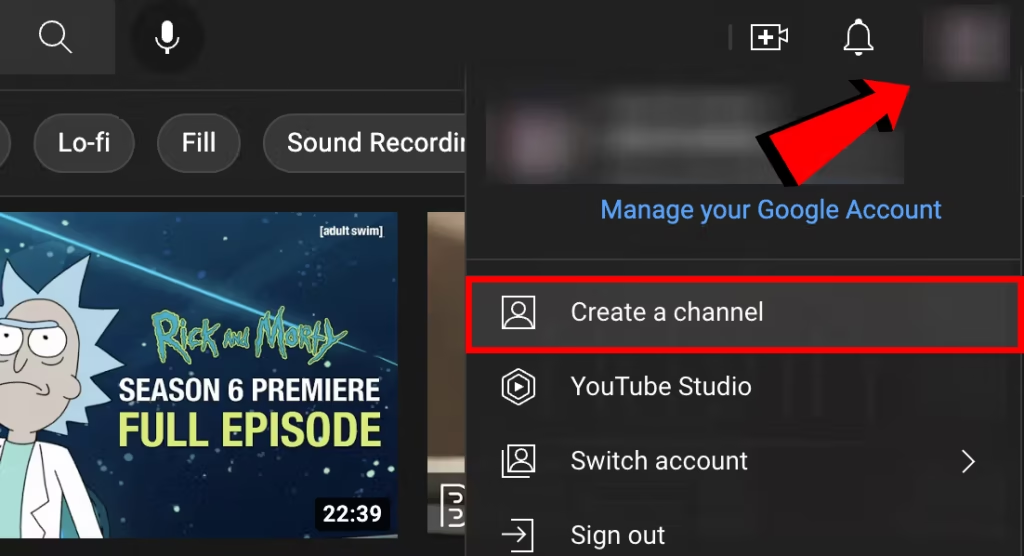
- Sign in to YouTube with your Google account.
- Select your profile icon, then click “Create a Channel.
3.Choose a different profile picture and give your channel a unique name.
Profile pictures should be:
- Square or round
- 800 X 800 px
- JPG, GIF, BMP, or PNG
4. Click On Create a New Youtube Channel.

Now your account is set up. The next step is to verify your phone number. Verifying your number allows you to upload videos longer than 10 minutes, use custom thumbnails, go live, and take part in challenges.
- Click on your profile picture and choose YouTube Studio.
- From the left-hand menu, click Settings.
- Under “Channel features,” select Verify Phone Number and follow the instructions.
After verification, you can make your channel look professional by adding a banner image and a video watermark.Verify Your Phone Number
Add a Banner and Video Watermark to Your Youtube Channel
1. Add a Banner (Channel Art)
step 1: Open YouTube Studio
Go to YouTube Studio.
Log in with your Google account.
Step 2: Go to Customization
In the left menu, click Customization.
Select the Branding tab.
Step 3: Upload Banner Image
Under Banner Image, click Upload.
Select your image.
size: 2565 x 1445 pixels (max file size 8 MB).
Adjust how your banner looks on TV, desktop, and mobile screens.
Step 4: Save
Click on Publish (top right).
Your banner will now be visible at the top of your channel page.
2. Add a Video Watermark
Step 1: Go to Branding in YouTube Studio
Again, open YouTube Studio.
Go to Customization → Branding.
Step 2: Upload Watermark
Click Upload and select your watermark image.
Best size: 150 x 150 pixels, transparent PNG works best.
Scroll to Video Watermark.
Step 3: Choose Display Time
- You can select:
- End of video (shows at the end only).
- Custom start time (appears after a set time).
- Entire video (shows from beginning to end – recommended).
- End of video (shows at the end only).
Step 4: Save
Click Publish.
Now your watermark will show on all your videos.
Pro Tips:
- For banner → Keep text/logo in the safe area (1546 x 423 pixels) so it’s visible on all devices.
For watermark → Many YouTubers use a small “Subscribe” logo in red & white.
Add Information in About Section
Fill out the ‘About’ section of your YouTube channel. Write a clear and attractive description that explains what your channel is about and gives viewers a good first impression.
Also, connect with your audience on social media by adding links to your Instagram, Twitter, and other accounts.
3. Find Your YouTube Channel Topic
Pick a main topic for your videos. This will define your channel’s identity and give viewers a reason to watch your content instead of others.
And there are some topics to choose from:
Trending & Evergreen YouTube Channel Topics
- Education & Learning
- Study tips & tricks
- Competitive exams guidance (SSC, UPSC, etc.)
- Language learning (English, Hindi, regional languages)
- Tech tutorials (Computer, WordPress, AI Tools, etc.)
- Study tips & tricks
- Technology & Internet
- Mobile/PC tips & tricks
- App & software tutorials
- AI tools ka use (ChatGPT, Canva, etc.)
- Tech news & gadget unboxing/reviews
- Mobile/PC tips & tricks
- Lifestyle & Personal Growth
- Motivational & life lessons (short videos work best )
- Daily routines, productivity hacks
- Book summaries & learnings
- Self-improvement content
- Motivational & life lessons (short videos work best )
- Money & Business
- Online earning ideas (freelancing, blogging, YouTu be growth)
- Investment basics (stock market, crypto, mutual funds)
- Entrepreneurship & business case studies
- Side hustles
- Online earning ideas (freelancing, blogging, YouTu be growth)
- Nature & Travel
- Vlogs of mountains, forests, nature places
- Travel guides & hidden places
- Wildlife & environmental awareness
- Vlogs of mountains, forests, nature places
- Entertainment
- Comedy skits & relatable short videos
- Storytelling (horror, moral stories, real-life cases)
- Reaction videos
- Music covers / dance
- Comedy skits & relatable short videos
- Health & Fitness
- Home workouts
- Yoga & meditation
- Diet tips
- Mental health awareness
- Home workouts
- Food
- Cooking recipes
- Street food vlogs
- Food challenges
- Diet-friendly food tips
- Cooking recipes
And so many others
But if you really want to stand on youtube then you should be consistent in your channel .
4. Identify Your Target Audience
Step 1: Define Your Content Purpose
What type of content am I creating? (Education, Tech, Lifestyle, Money, Nature, etc.)
What value will my videos provide? (Entertainment, Motivation, Skills, Knowledge)
Why should people watch me instead of others? (Unique style, storytelling, experience, or expertise)
Example: If you make tech tutorials, your target audience could be students, freelancers, or beginners who want to learn technology.
Step 2: Understand Audience Demographics
Think about audience :
Age group (10–18 = students, 18–30 = youth, 30+ = professionals)
Gender (male, female, or both)
Location (local, national, global audience)
Language (English, Hindi, Hinglish, regional language)
Example: If your content is WordPress tutorials in Hindi, your target audience = 18–35 years old, students + freelancers in India.
Step 3: Identify Audience Problems & Interests
Use YouTube search bar → check what people are searching
Check Google Trends, Quora, Reddit for popular questions
Use tools like TubeBuddy or VidIQ for keyword research
Example: If many people search “How to earn from blogging without investment”, that’s a hot topic, and your audience is people interested in online earning.
Step 4: Create an Audience Persona
Build a simple audience profile (also called audience avatar).
Example : Grow Rich
- Name: GhanShyam
- Age: 22
- Location: India
- Interests: Blogging, online earning, AI tools
- Problem: Wants to earn online but doesn’t know how
- Solution: Your videos explain step-by-step in simple language
Step 5: Test & Refine with Analytics
Upload different types of videos in your youtube Channel
Check YouTube Analytics → watch time, age group, gender, location
Double down on content that performs best with your audience
Formula:
Content Niche + Audience Demographics + Their Problems + Your Solution = Target Audience
5. Find Your Competitors on YouTube
As a YouTuber, you should know that you have competitors on YouTube who make the same videos as you. If there are already many competitors on that topic, then you should change your content and make videos on such topics which have less competition so that the audience gets to see your video first and you will be able to grow quickly on YouTube.
If you have already posted 10-15 posts on your channel, then you have to observe that your videos are better than your competitors’ videos and people like to watch your videos
6. Create a List of Youtube Video Ideas
To grow on YouTube, you need a perfect plan for which you need to make a list of YouTube videos so that in the future you do not have to think too much about which video to create today.
YouTube video ideas come from many places. You can research:
What competitor channels are posting in their channel
News within your topics
Trending topics upload in your channel
7. Test Your Youtube Channel Topics in Keyword Research
Now that you have a list of video ideas, it’s time to check which ones are popular on YouTube.
This means finding out the exact words people type in the YouTube search bar.
If you know what your audience is searching for, you can get more views. Just add those words (keywords) to your video titles and descriptions. This helps YouTube understand what your video is about and show it to the right viewers.
Do you want to know which search words match your video ideas? Or how many times people search for those keywords each month and Days
8. Get the Right Equipment for Your YouTube Channel
Starting a YouTube channel won’t cost you a single penny. It’s completely free to create, and you don’t need to spend anything just to set it up.
But…
The cost comes later when you start making videos. The money you spend depends on the type of content you create.
Example:
- If you are a beginner → You can simply use your smartphone to record videos. No extra cost.
- If you want better quality → You might need things like:
- Camera (DSLR or smartphone with good camera)
- Microphone (for clear sound)
- Video editing software/app
- Storage (like memory cards or hard drives)
- Lighting (if you record indoors)
- Tripod (to hold camera steady)
- Camera (DSLR or smartphone with good camera)
Simple Rule:
- For vlogging in sunlight → you may not need lights, but a tripod or mic will help.
- For indoor tutorials → you may need extra lights.
- For gaming videos → you’ll need screen recording software + good mic.
So, the cost depends on your video style. You can start free with what you already have, then slowly upgrade as your channel grows.
9. Post Your First Video in Your Youtube Channel
Now you’re ready to upload your first YouTube video.
Here’s how you can do it:
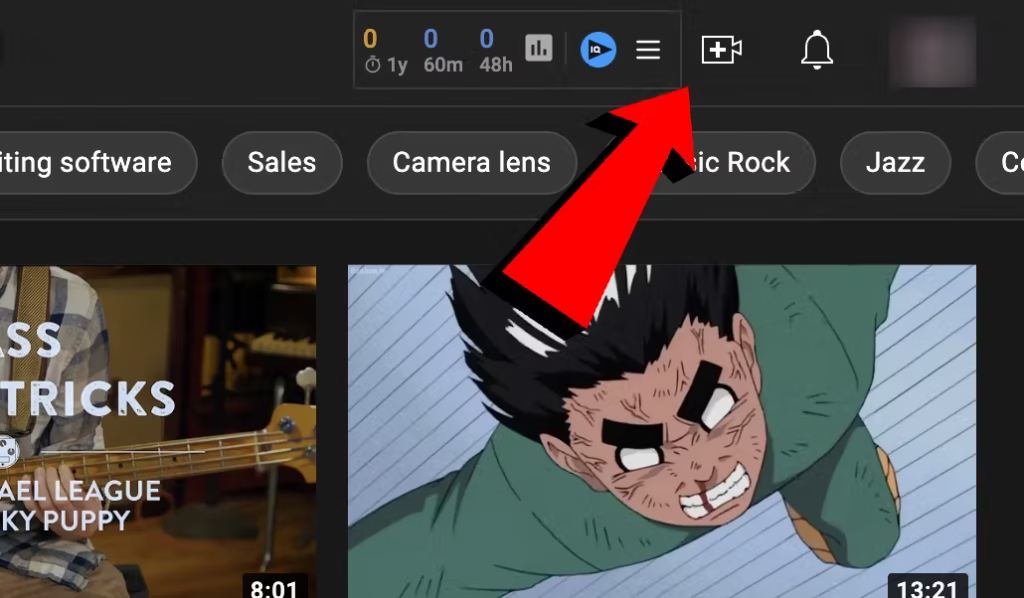
- Open YouTube.com and click on the camera icon near your profile picture.
- Choose Upload Video from the menu.
- Either drag and drop your video into the upload box, or click Select Files to pick a video from your computer/phone.
- Follow the steps on the screen (like adding title, description, tags, and thumbnail) to finish uploading.
10. Conclusion
Starting a YouTube channel is easier than most people think. All you need is a Google account, a niche or topic you’re passionate about, and the willingness to share your ideas through videos.
From setting up your channel and customizing it, to planning your content and finally uploading your first video, each step brings you closer to building your online presence. Remember, you don’t need expensive equipment at the beginning—your creativity, consistency, and effort matter the most.
So, take the first step today, create your channel, and start sharing your voice with the world